Home » Posts filed under Home And Living
Home Garden Lighting
 Posted in
 Wednesday, February 2, 2011|
 Unknown
Garden is a good place to feel the nature even in metros. It's quite obvious that people enjoy the scenic beauty on fresh sunny morning but what about when it is dark. By installing right lights, garden can be changed into a romantic haven at night. Outdoor garden lighting will not only beautify your garden, but also prevent accidents in the dark. Basically, there are two types of garden lighting: low voltage garden lighting and solar garden lighting.
Low Voltage and Solar Garden Lighting
As the term suggests, Low voltage garden lighting is very economical. Moreover it is shock-free, so it's great for people having children and pets. The electricity, required for running these lights, is supplied by the power pack and is controlled by an automatic timer. Another cost-efficient and commonly used lighting is Solar Garden lighting. It is easy and doesn't need to be turned on or off. Solar garden lighting doesn't require any type of wiring, and saves electricity bill as it converts solar energy to electric power. However, solar garden lighting is not meant for large area or for parties.
Outdoor Garden Lighting Ideas
It's entirely up to you as how you want to illuminate your garden. However, here are given some garden lighting tips and ideas to facilitate your task of illuminating home garden.
Path Lighting:
It looks just fabulous and also makes an important part of any garden lighting project, for safety and aesthetic purposes. The best part about path lighting is that you see the effect, but not the source. Besides, it helps to safely lead from one location to another in the garden.
Step Lighting:
This type of lighting entails discrete small fixtures, which reliably light up the area - just exactly where required - in your garden. It makes steps and stairs safe and easy to use, in low light conditions.
Uplighting:
This lighting imparts a dramatic effect in the garden. It is usually used for highlighting focal points.
Down Lighting:
It is the technique of lighting plants and objects from above. It creates the most natural garden & landscape effect.
Specialty Lighting:
It usually calls for either in-wall, or surface mounted outdoor lighting installations. It helps to provide interesting highlight areas in the garden and define vertical surface areas.
Pool & Pond Lighting:
Such type of lighting has been specially designed to withstand the harsh conditions found in and around garden pools & ponds.
Lighting Accessories:
Check out the range of transformers and luminaries that match and enhance your garden lighting set up. There are accessories available in markets, to mount and enhance your garden lighting effects.
Low Voltage and Solar Garden Lighting
As the term suggests, Low voltage garden lighting is very economical. Moreover it is shock-free, so it's great for people having children and pets. The electricity, required for running these lights, is supplied by the power pack and is controlled by an automatic timer. Another cost-efficient and commonly used lighting is Solar Garden lighting. It is easy and doesn't need to be turned on or off. Solar garden lighting doesn't require any type of wiring, and saves electricity bill as it converts solar energy to electric power. However, solar garden lighting is not meant for large area or for parties.
Outdoor Garden Lighting Ideas
It's entirely up to you as how you want to illuminate your garden. However, here are given some garden lighting tips and ideas to facilitate your task of illuminating home garden.
Path Lighting:
It looks just fabulous and also makes an important part of any garden lighting project, for safety and aesthetic purposes. The best part about path lighting is that you see the effect, but not the source. Besides, it helps to safely lead from one location to another in the garden.
Step Lighting:
This type of lighting entails discrete small fixtures, which reliably light up the area - just exactly where required - in your garden. It makes steps and stairs safe and easy to use, in low light conditions.
Uplighting:
This lighting imparts a dramatic effect in the garden. It is usually used for highlighting focal points.
Down Lighting:
It is the technique of lighting plants and objects from above. It creates the most natural garden & landscape effect.
Specialty Lighting:
It usually calls for either in-wall, or surface mounted outdoor lighting installations. It helps to provide interesting highlight areas in the garden and define vertical surface areas.
Pool & Pond Lighting:
Such type of lighting has been specially designed to withstand the harsh conditions found in and around garden pools & ponds.
Lighting Accessories:
Check out the range of transformers and luminaries that match and enhance your garden lighting set up. There are accessories available in markets, to mount and enhance your garden lighting effects.
Room Decor Ideas
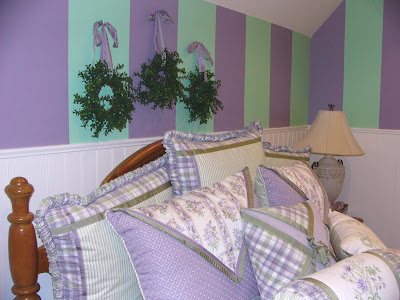
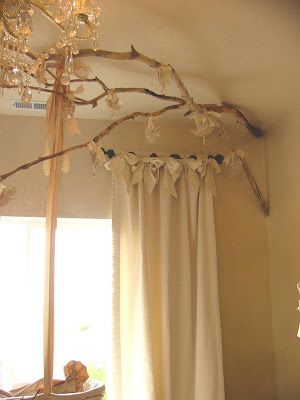
Here are some beautiful room decors for the new borns and kids .hope you'll like it





Graceful – Flower Arrangement
Flowers arranged in tall containers have their own grace. This arrangement is made in a Bamboo vase that I bought in Cauvery Nisargadhama. The measurements for the flowers to be cut is per Ikebana rules.

Materials Required:
1 tall vase
3 Gladioli
3 Bulrushes
3 Golden Rods
2 Philodendron leaves
Method:

Fill vase with water. Cut first Bulrush into one and half the height of the vase and the other one as ¾ th of the first Bulursh and the third one as ¾ th of the second bulrush. Similarly cut the first Gladioli as ¾ th of the first Bulrush and the 2nd gladioli as ¾ th of the first Gladioli and so on. Likewise cut the first Golden Rod as ¾ th of the first Gladioli and the 2nd Golden Rod as ¾ th of the first Golden Road and so on..

Materials Required:
1 tall vase
3 Gladioli
3 Bulrushes
3 Golden Rods
2 Philodendron leaves
Method:

Fill vase with water. Cut first Bulrush into one and half the height of the vase and the other one as ¾ th of the first Bulursh and the third one as ¾ th of the second bulrush. Similarly cut the first Gladioli as ¾ th of the first Bulrush and the 2nd gladioli as ¾ th of the first Gladioli and so on. Likewise cut the first Golden Rod as ¾ th of the first Gladioli and the 2nd Golden Rod as ¾ th of the first Golden Road and so on..
Fruit Flowers and Light
This is Dutch style of flower arrangement. The materials used range from fruits, flowers and candles. The different hues of flowers and fruits complement each other with candles lighting up the arrangement. This arrangement is perfect during Diwali.

Materials Required:
3 Red Apples
2 Yellow Pears
2 Small Bananas
5 Red Roses
2 Candles
Few Stalks of Cyprus
1 block of Sponge soaked in water for at least half an hour
1 basket
A small plastic sheet
Method:
Line the bottom of the basket with a plastic sheet. Place the sponge in the middle. Arrange the fruits first on the sides of the sponge. Cut the Roses in different lengths. Stick the Roses in any pattern you desire into the sponge. Cut the Cyprus stalks into long and short stems. Stick these on the other later and camouflage the sponge. Stick Candles into the sponge and light it up.

Materials Required:
3 Red Apples
2 Yellow Pears
2 Small Bananas
5 Red Roses
2 Candles
Few Stalks of Cyprus
1 block of Sponge soaked in water for at least half an hour
1 basket
A small plastic sheet
Method:
Line the bottom of the basket with a plastic sheet. Place the sponge in the middle. Arrange the fruits first on the sides of the sponge. Cut the Roses in different lengths. Stick the Roses in any pattern you desire into the sponge. Cut the Cyprus stalks into long and short stems. Stick these on the other later and camouflage the sponge. Stick Candles into the sponge and light it up.
Easy Applique Pillow
A simple tulip applique transforms a plain pillow into a showpiece. Here's a step-by-step guide to adding layers of beauty with hand-stitched applique
Make an Applique Pillow

Hand applique is a simple crafting technique that layers fabric shapes on top of another to make a design. Applique is the French word meaning "to put on." The technique adds interest to anything made from fabric, and allows you to work in all those wonderful scraps of fabric you adore but couldn't find a way to use. You can make this pretty applique pillow in an afternoon.
Choose Applique Fabrics

When selecting fabrics for an applique project, chose different patterns in the same color family for visual interest. Thin 100-percent-cotton quilter's fabric works best for most applique projects
Supplies

* Template plastic
* Template Pencil
* Small, sharp scissors
* Blue water-soluble marker
* Fabric (100 percent cotton)
* Thread (100 percent cotton in colors that match your applique fabrics)
* Pins
* Fine quilting needle
Step 1

Trace or draw your desired pattern onto template plastic using a template pencil. (Unlike a regular pencil, a template pencil will not smear.)
Step 2

Carefully cut out the pattern on the drawn line.
Step 3

Place the template on the right side of your chosen fabric, and trace it using a blue water-soluble marker. Cut out the fabric shape about 1/4 inch outside the traced line. The extra 1/4 inch is the seam allowance.
Step 4

To prepare the shape for appliqueing, tuck the seam allowance under and hand-press it in place. You may need to make small cuts into the seam allowance to achieve smooth results on curved edges.
Step 5

Pin the prepared shape in place on the base fabric. Baste near the edge to hold in place. Remove the pins.
Step 6

Using needle and thread, sew the hand-pressed edge of the shape to your base fabric using a tiny slip stitch. Remove the basting stitch. Erase any blue marks by dabbing with a damp cloth. You've just completed an applique!
Alternate Stitches: Blanket

The traditional hand-stitched applique employs a fine slip stitch to attach an applique shape to the base fabric, but you can also use alternative techniques.
For variation, cut out your shape on the traced line (no seam allowance is needed), and blanket-stitch your applique shape in a contrasting- or coordinating-color embroidery floss.
Alternate Stitches: Machine

You also can applique on your sewing machine. Simply cut out your shape on the traced line (no seam allowance is needed), and sew a tight zigzag stitch along the edge of the applique. This results in a smooth raised edge.
Stitchless Applique: Iron on Felt

You can applique without sewing. Simply trace your shape on fusible web and a nonfraying fabric, such as felt. Cut out your shapes on the traced lines (no seam allowance is needed), then iron on your design.
Alternate Fabric: Microsuede

Microsuede boasts a luxuriously soft texture that's fun to use in applique. Because it's a nonfraying fabric, no seam allowance is needed. Simply cut out your shape on the traced line, then stitch or iron it on.
Make an Applique Pillow

Hand applique is a simple crafting technique that layers fabric shapes on top of another to make a design. Applique is the French word meaning "to put on." The technique adds interest to anything made from fabric, and allows you to work in all those wonderful scraps of fabric you adore but couldn't find a way to use. You can make this pretty applique pillow in an afternoon.
Choose Applique Fabrics

When selecting fabrics for an applique project, chose different patterns in the same color family for visual interest. Thin 100-percent-cotton quilter's fabric works best for most applique projects
Supplies

* Template plastic
* Template Pencil
* Small, sharp scissors
* Blue water-soluble marker
* Fabric (100 percent cotton)
* Thread (100 percent cotton in colors that match your applique fabrics)
* Pins
* Fine quilting needle
Step 1

Trace or draw your desired pattern onto template plastic using a template pencil. (Unlike a regular pencil, a template pencil will not smear.)
Step 2

Carefully cut out the pattern on the drawn line.
Step 3

Place the template on the right side of your chosen fabric, and trace it using a blue water-soluble marker. Cut out the fabric shape about 1/4 inch outside the traced line. The extra 1/4 inch is the seam allowance.
Step 4

To prepare the shape for appliqueing, tuck the seam allowance under and hand-press it in place. You may need to make small cuts into the seam allowance to achieve smooth results on curved edges.
Step 5

Pin the prepared shape in place on the base fabric. Baste near the edge to hold in place. Remove the pins.
Step 6

Using needle and thread, sew the hand-pressed edge of the shape to your base fabric using a tiny slip stitch. Remove the basting stitch. Erase any blue marks by dabbing with a damp cloth. You've just completed an applique!
Alternate Stitches: Blanket

The traditional hand-stitched applique employs a fine slip stitch to attach an applique shape to the base fabric, but you can also use alternative techniques.
For variation, cut out your shape on the traced line (no seam allowance is needed), and blanket-stitch your applique shape in a contrasting- or coordinating-color embroidery floss.
Alternate Stitches: Machine

You also can applique on your sewing machine. Simply cut out your shape on the traced line (no seam allowance is needed), and sew a tight zigzag stitch along the edge of the applique. This results in a smooth raised edge.
Stitchless Applique: Iron on Felt

You can applique without sewing. Simply trace your shape on fusible web and a nonfraying fabric, such as felt. Cut out your shapes on the traced lines (no seam allowance is needed), then iron on your design.
Alternate Fabric: Microsuede

Microsuede boasts a luxuriously soft texture that's fun to use in applique. Because it's a nonfraying fabric, no seam allowance is needed. Simply cut out your shape on the traced line, then stitch or iron it on.


Sponsors
Popular Posts
-
 Breast tattoos are different from chest tattoos, since many tattoo designers only consider tattoos put directly upon a woman's tit to be...
 -
 Here Are Some More Cool Military Tattoo Designs. Military Tattoos Pictures Military Tattoos Pictures Military Tattoos Pictures Military Tatt...
 -
 Whether found on the beach or bought in a craft store, shells can add a touch of seaside flair to any room. Beach Detailed Flower Holder Rep...
 -
 Here Are Some Latest Cat Tattoo Designs. So cute this cat. I love this cat tattoo. Though this black cat is not that cute, still I like it s...

Recent Stories
Connect with Facebook
Sponsor
Search Site
Categories
- Art (37)
- Automobiles (6)
- Craft (66)
- Drinks / Starters (29)
- Economics (6)
- Fashion (19)
- Festivals (25)
- Finance (45)
- Gardening (16)
- Health and Fitness (39)
- Home And Living (26)
- Humour (62)
- Internet (6)
- Management (49)
- Nutrition (6)
- Other Stuff (66)
- Party (21)
- Quotes/SMS (4)
- Receipes (138)
- Relationship (1)
- Relationships (29)
- Spiritual (26)
- Stories (44)
- Tattoos (39)
- Technology/Science (17)
- Tips (32)
- Travel (6)
Recent Comments
Tag Cloud
Tags
- Art (37)
- Automobiles (6)
- Craft (66)
- Drinks / Starters (29)
- Economics (6)
- Fashion (19)
- Featured (5)
- Festivals (25)
- Finance (45)
- Gardening (16)
- Health and Fitness (39)
- Home And Living (26)
- Humour (62)
- Internet (6)
- Management (49)
- Nutrition (6)
- Other Stuff (66)
- Party (21)
- Quotes/SMS (4)
- Receipes (138)
- Relationship (1)
- Relationships (29)
- Spiritual (26)
- Stories (44)
- Tattoos (39)
- Technology/Science (17)
- Tips (32)
- Travel (6)